

As Winter wind and cold settle in, we are seeing so many cases of dry, irritated and wrinkled looking skin. This is not a season that our skin looks forward too. The intense cold winds coupled with blasting indoor heat steals our internal moisture away like a jedi thief - leaving us parched, both inside and out.
Keeping your wondrous Third Lung - aka your skin - healthy and well moisturized is most definitely a challenge, even for those not usually dry. So it's imperative that you understand the proper way to keep your skin well hydrated and moisturized. Not only because this keeps you looking radiant - but because it also keeps your Third Lung functioning well.
MOISTURIZING SKIN REQUIRES MORE THAN A CREAM
Most people look for a moisturizing cream or the right serum to resolve dry skin. But actually, a cream is probably the least important element of an effective moisturizing regimen. Many of our skin clients have one they use regularly - but still complain of stubborn dryness.
This is because Winter skin needs more than a cream to build and maintain moisture. Successful moisturizing requires three basic steps: WATER, OIL and a SEAL. This principle is not unlike the needs of your body. You not only nourish yourself with (healthy) fats, you hydrate your tissues with water. Likewise for your skin.
So how exactly do you properly feed your skin with water and fatty nutrients? Simple.....just follow THE STEPS.
BUT FIRST, GET A HUMIDIFIER
This is a non-negotiable in the Northeast, not only for your skin but your immune strength and overall health. Our indoor heat systems tend kick into overdrive when it's 8 degrees outside. Of course, we have to be grateful for even having heat in such conditions, but we also have to make sure it doesn't burn up all our moisture. Your skin and body require a certain level of humidity to function well, and a humidifier is an important way to rehydrate the air so that your environment doesn't wick away your moistness.
STEP ONE: WATER
Applying water to the skin is a very important opening step to effective moisturizing. It both feeds your dermis with fluids, and also opens the skin to absorb what you apply after in Step 2.
Your skin is like a sponge. If you apply dish soap to a dry, hardened sponge, what happens? The soap sits on top of the surface. But wet the sponge with water first and the pores of the sponge open and expand – softening the surface and drawing the soap inward.
Oil or cream applied to dry skin similarly just sits atop the surface. But wet it first, and voila - softened, hydrated skin ready to absorb.

Josh Rosebrook, creator of one of our favorite lines of natural skincare, tells it like this, “Water opens the skin surface – allowing a moisturizing oil to travel on the vehicle of the water inward, penetrating and locking in moisture. But, water can’t act as a transporter when it’s inside a cream. So the water hydration step cannot be skipped over.”
What are the best ways to deliver water to skin? Quite simply, a shower or splash from the tap will do the trick. But if infusing your skin with NYC tap water isn't your thing, try an all-natural, nutrient-infused hydrosol or hydration spray. Two of our favorites include: Josh Rosebrook's Hydrating Accelerator and Laurel Whole Plant Organics' Facial Elixirs.

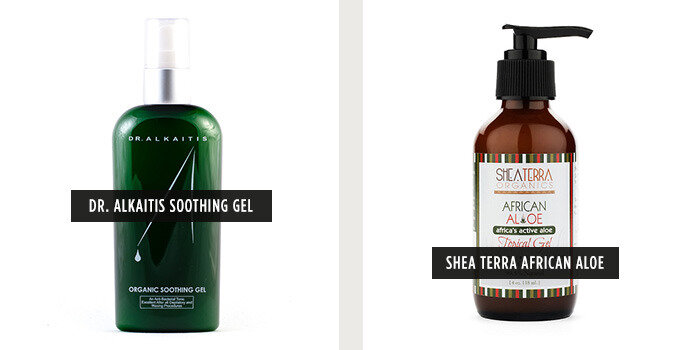
For very dry skin types, a thicker gel or serum that is water based works wonders as a hydration layer. Look for straight aloe, aloe-based or glycerin-based serums. Apply on top of a water spritz or use directly on dry skin as your first layer. Be sure that your skin feels softened and damp before moving on to step two. We are currently obsessed with Shea Terra's African Aloe and also like Dr. Alkaitis Soothing Gel.
STEP TWO: OIL
Now that your skin is softened and quenched with water, it's ready for a healthy fat. We prefer a straight oil or oil blend, undiluted with other ingredients. Our favorites are formulated with well-sourced, high quality, organic oils - some even infused with herbs that elevate their nutrient profile and efficacy. One should never skimp on oil quality because rancid or oxidized oils are harmful to health.
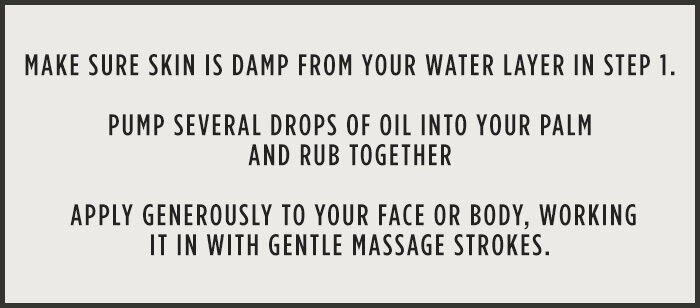
If you're someone who feels "greasy" from using oils, most likely you're not applying it properly. By adding the WATER hydration step above, your oil should absorb efficiently into your dermis without leaving a greasy layer sitting atop your skin.
Those of you who love your creams may be wondering, why forego your go-to product for an oil? According to Rosebrook, "oils offer direct nutrients to the skin. To make a cream, oils are usually diluted with water components, which require emulsifiying agents to create the creamy texture. And because water has been added, preservatives are required to prevent bacterial growth. Both emulsifiers and preservatives are not only unnecessary to moisturizing, they often block the nutrients from entering the skin properly."
Will a cream deliver moisture to your skin? Sure. But will it stand up to Winter and and will it turn on the radiance of your skin? As experts who work on many clients with varying skin types, the results are far more impressive when these Steps are used, versus relying on a single product.
Don't get us wrong, we aren't anti-cream. But as a holistic skincare studio that specializes in all-naturals, most of the creams we've tried haven't met our pureness requirements or performance standards (except one, see below). What does impress us are these seasonal oils and blends for Winter that offer skin extra silky nourishment without being heavy: Laurel Balancing Serum, Drunk Elephant Extra Virgin Marula Oil, and Shea Terra Baobob Oil.

Another great feature of oils is that they don't require a preservative the way a cream does. Good quality oils don't carry a risk of bacterial contamination, but do need to be stored properly to prevent rancidity. If an oil is rancid it will smell "off" - kind of like how your clothes reek after being in a fried food joint. Look for oils that come in dark containers impenetrable to light and/or store them in a cool, dark cabinet away from sunlight.
STEP THREE: SEAL
If we've got you feeling down on your moisturizing cream, not to worry it still plays a role in this routine. Because many cream formulations penetrate more slowly, hanging out at the skin surface (especially heavier creams), they provide the perfect seal to protect the softness and fluidity created with your WATER and OIL steps. This is especially the case in drier climates and cold seasons. In warmer months, milder and more humid climates, this barrier layer is often not necessary.
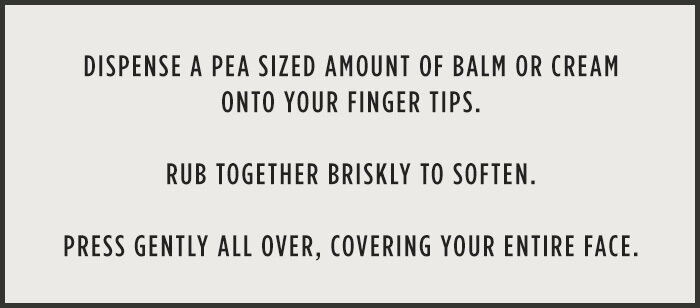
If you live in a climate where the cold and wind are smacking the moisture right out of your pores, a SEAL layer will save your skin. If you find it difficult to maintain moisture, we recommend a FACIAL BALM to deliver additional nourishment and act as a protective barrier. A butter, like shea butter will also work, but we find that facial balms are lighter and smoother. At the studio we are loving the performance of: Laurel Healing Balm and Transform Daily Balm.
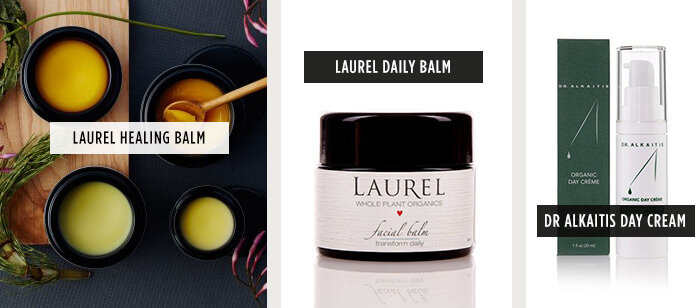
For oilier and more congested skin types, a cream may be a better choice as a barrier layer (unless you wear make-up and/or SPF, see below). Our gold standard cream selections are the Dr. Alkaitis Day andNight Cremes. Unlike the many all-natural moisturizing creams we've tried, these penetrate the dermis brilliantly and efficiently nourish skin with vitamins, herbs and essential oils. One caveat, we've noticed that sensitive skin types can be reactive to these creams, so be sure to try a sample first.
WET, NOURISH, SEAL...REPEAT
Don't hesitate to repeat these Steps as many times a day as necessary to keep your skin fluid and moist. It's inevitable that if you're out in the cold and wind, your skin may take a beating. And even if you've diligently applied all your Steps in the morning, you may need to reapply mid-day depending on the dryness conditions at your home or office. And definitely go through the Steps at night before bed.
It's such a great 5 minute break to run through your new skin ritual. We carry around travel size versions of our products, or dose some into travel containers to keep a set with us through the day. When you're ready for a much needed time out, these 3 Steps are not only a positive thing to do for your skin - they provide a beautiful sensory experience that for a moment takes you out of your head and grounds you into your body. So nice...
WHEN TO APPLY MAKE-UP OR SPF
If you wear make-up or SPF, these should be applied after the Steps. If you find that it's too heavy or congesting to do it all, then simply skip Step 3-Seal. Your make-up or SPF are effective barriers unto themselves. Just remember, if you spend most of your day indoors you may not need SPF.
Keep in mind, we're providing a basic framework that we've seen benefit most of our clients, but as with all things you should try it for yourself see what works best for you. And please let us know how it goes using the comment box below. Stay moist and fluid!